Tuesday, December 27, 2011

hand-crafted cards made easy ..

Pin It

(warning .. EXTREMELY picture-heavy post)
When I knew it was time to make our cards this year, the idea seemed like such a simple one.
hand-made Christmas cards ...
I mean really - how difficult could it be ? :)

Anytime you ask yourself that - you should ALWAYS know it's a precursor to terror.

ok, honestly it wasn't so much difficult as it was tedious and painstakingly time-consuming. But, in the end I managed to create almost 4 dozen cards; 90% of them unique + 100% created with scrap booking supplies & our little hands. :)

In the beginning - I tried to make each card totally different from the last.


ribbon cut at an angle in descending sizes
buttons hot glued on as ornaments


scrapbook paper cut to the length of the card
ribbon hot glued on top & bottom border


I laid my buttons on the card in a tree shape
lifted the buttons one at a time- placing them back onto hot glue

hot glued ribbon on top for 'tree star'


2 pieces of contrasting scrapbook paper cut to length of card and hot glued in place
ribbon cut to same length and hot glued over 'seaming' both papers together
stamped 'happy holidays' onto cardstock, then cut out and hot glued onto card


cut scrapbook paper and ribbon to fit card width
added scrap book candy cane embellishment + buttons and then stamped


Friday, December 23, 2011

multiple rudolphs spotted!!

OOOoohhhhh !! It's the 'day before the day before Christmas!'

I just can't WAAAAAIIIIIT !!
..... but they say I have to (frowny face).

So, today to pass some time - mission : Christmas treats for friends & neighbors.

the star was definitely the 'pinspired' Rudolphs

They're simply sugar cookies in a gingerbread man shape, turned upside down and painted awesomely .. by my super-amazing, excellent icing piper husband ;)

By the time these were ready to be beautified, I was so baked out, carded out and shopped out; I couldn't see straight. I merely showed him the picture and he happily went to town ... one more reason I love him so.

The final product was a dozen or so friends and family trays ... yum-o.

Just a few of our family's traditional Christmas treats, ever since I can remember.

Happy Holidays and try to do something nice for someone who has less than you .. pay it forward.


(left to right, clockwise) chocolate cherry cheese squares, walnut walkaways, peanut butter cookies, Gramma Kitty's sugar cookies, and brownies.

Wednesday, December 21, 2011

oh my .. the Christmas cards !


I can't believe I did it .. but I did.

43 hand-made Christmas cards !!

More pictures to come .. but this is the pile .. I'm exhausted and still have to address / stamp / send off in the next 12 hours ! AAARRGGHHHH !!!

I just have to keep reminding myself ...
I love Christmas .. I love Christmas .. I love Christmas ...

Sunday, December 18, 2011

I have no TIME to be sick..

but for some reason - I am!

I have cards to make, a Christmas letter to write, cookies and other goodies to make, stuff envelopes .....

that very sentence made my face hurt - I'm going to bed.

Saturday, December 17, 2011

love for teacher


Third grade has, so far, been a year of change. Since kindergarten our daughter has consistently shared a classroom with her 'very besties.' Much to her disappointment, she was not placed with her close inner circle when it came time to assign classrooms this year. In fact - she got placed with a, shall I say, less-than-compassionate teacher.

Long story short - an anonymous donor afforded our small school enough money for 1 extra 3rd grade teacher. When it came time to reassign 5 kids from each class .. we made it clear we would love (with a capital L) for her to be able to change. we did a happy dance when she did :)

She's had nothing but straight A's and nice things to say about her teacher .. I'm so glad. I remember third grade being such a 'transition' for our oldest. Cursive and multiplication and all that .. *phew*

Anyway .. /end rambling :)) She was very excited to make her teacher a gift for the upcoming holiday.

of course .. finding myself pinspired - "
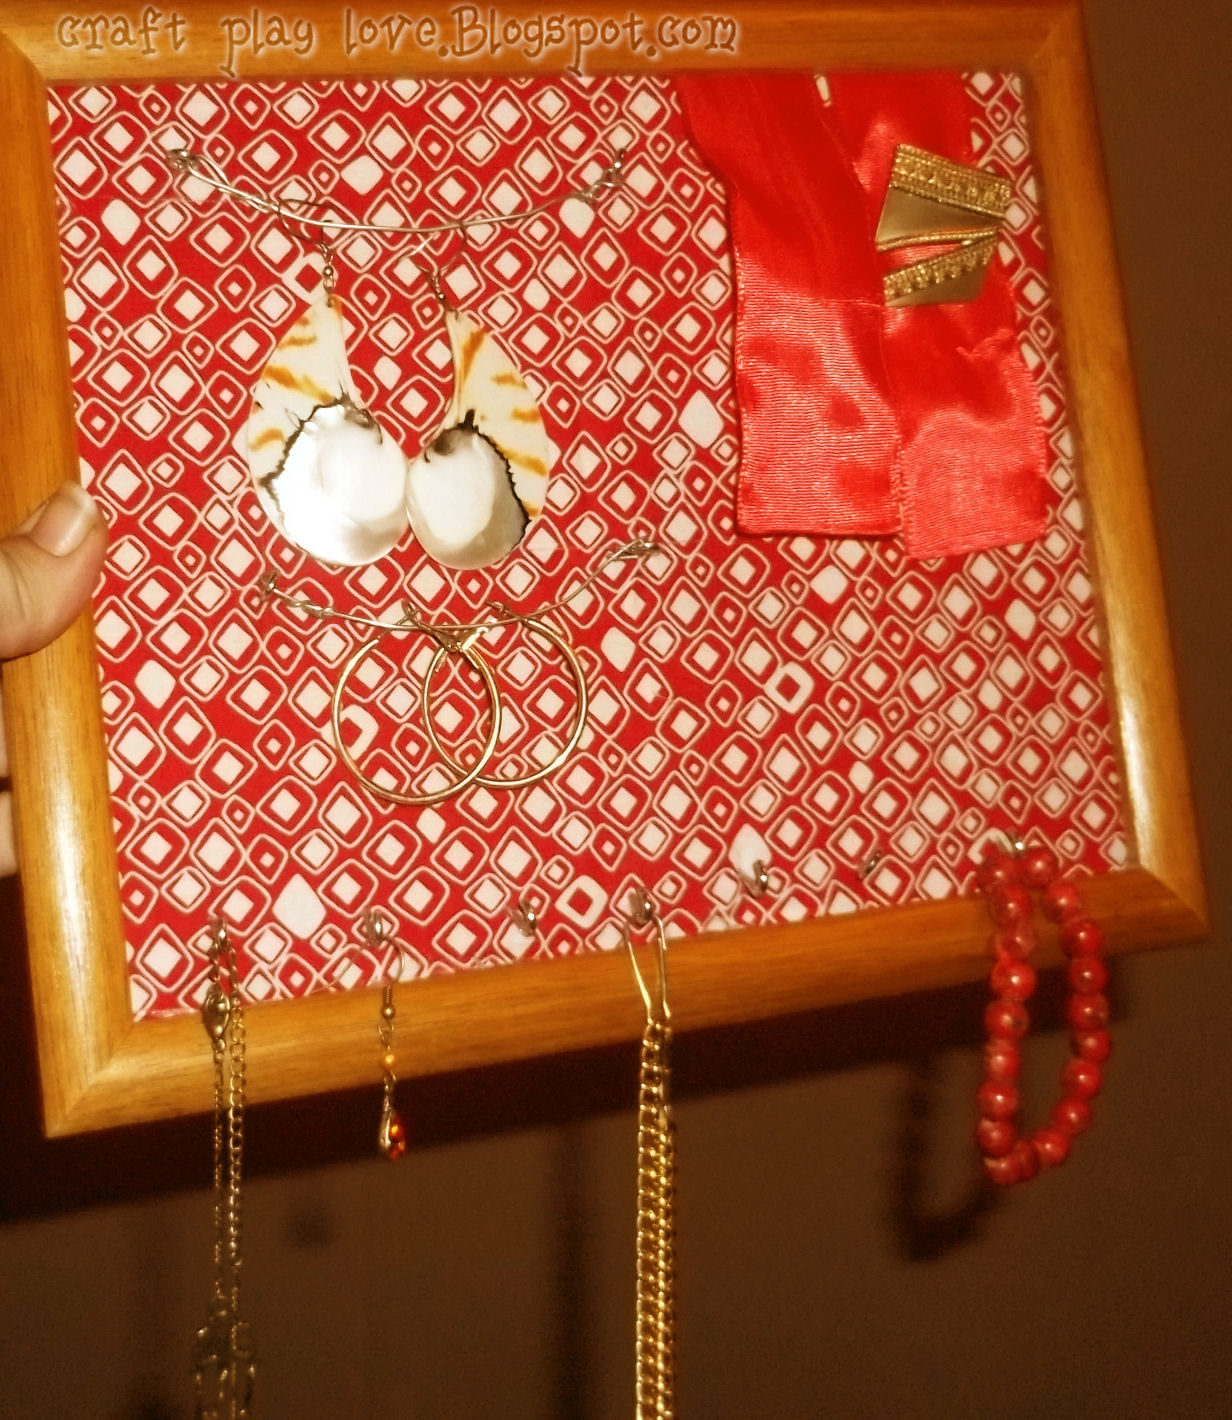
we" chose to make her our own style of one of these types of 'picture frame jewelry displays.'

I thought it would be as simple as discard the glass - cut & glue together a piece of cardboard - glue on a layer of cork board - cover with fabric - then attach screws in hooks, ribbons, embellishments.. etc. done. hehehe .. no.

First .. it didn't really need the cork. It needs wood in order to really secure the hooks for necklaces.

Second .. it didn't fit the 'hanging back' after I glued all the pieces in. (it worked this time, though - because she got to sign a little Merry Christmas on the back, with her name/school year, etc. ... the teach can figure out how to hang it :P )

Third .. there was going to be NO hand-screwing of hooks into the frame. There was just too much pressed wood .. :/ ouch.

Fourth .. trying to eyeball a straight line, while screwing into cork .. isn't a good idea.

Despite the hurdles .. we managed to get 'er done.

When/if I do this again, I'll be going with separate frames for each type of jewelry. It would be a cool feature on a wall to line up three 5x7 matching background frames - one for long stem earrings, one for backed earrings, and one with nothing but big hooks for necklaces. :) I smell another prrrooojeecctt ! :P But for now .. here's the one I've been rambling about.


  • we removed/ discarded the glass
  • cut out an identical piece of cardboard as well as cork to fit the frame
  • hot glued fabric to cover the front
  • hot glued the hanging ribbon, to the back
  • hot glued the entire piece into the frame
  • screwed a (not so straight) line of hooks along bottom
  • screwed in hooks with wire attached between, up top
  • high five the kid .... then mentally scrutinize all the things I'd do better, next time
  • done ! :P

Wednesday, December 14, 2011

shmelty melty crayola fun

One of the very first things that made me screech with excitement while Pinteresting; was all the melted crayon art. When I called over and showed my tiny humans the examples .. there was a squeal of equal or greater excitement. :)

An attractive feature of this craft was the simplicity. Don't get me wrong - I'm down for a challenge; but I'm one who also enjoys the easy peasy stuff from time to time, too.

If you skim through this video it'll be simple.

cool picture of the night award goes to ^__^
The first thing we did was paint our canvases with dark acrylic. White just seemed like such a boring background for the fun color project. The little one and I went with black - while the hubby chose a dark purple.

After we let it dry, we figured out the arrangement we wanted our crayons to be, on the canvas. LoL 'let it dry' sounds so patient ... we totally used my hair dryer. ;)


Tuesday, December 13, 2011

dear snow ..

I only conceded to your visits, 1 day a year ... that day is Christmas.
12 is the number of days you are early.
I fail to see the humor in your appearance, tonight.
go on now ... shoo !


and in the a.m. the Volvo didn't look all too impressed with it, either


Sunday, December 4, 2011

the pine cones are coming! the pine cones are coming!

No matter which way you walk up - you cannot miss the 40 foot white pine that towers over our home. Outside of the annoying roof scraping in a windstorm & loudly dropping pine cones; it's kinda pretty.

I've forever been fond of pine cones and their little 'bug apartment layers.' (that's what I thought when I was 6..) They're neat, complex little bits of proof that nature is pretty damned majestic.

When it's time to clean up ... the pine cones are annoying.
When it's time to craft .. the pine cones are made of awesome sauce. :)

In line with my simple/budget friendly Christmas theme - I decided to make use of the little buggers. Despite the 30 degree weather - we slapped on coats, gloves & hats to brave the cold and gather our 'supplies.' ( By "we" .. I mean everyone minus the teenager. She was on a really good chapter and couldn't be bothered. *insert semi-eye roll here* )


After we grabbed what I thought to be sufficient pine cones; we laid down newspaper on the back deck & spread the cones out to be 'Christmasified!'


"Let's paint!"

Friday, December 2, 2011

simple + budget friendly x-mas decor

If you were to ask me what my favorite season is, I'd answer with a resounding "Christmas!"
If you were puzzled and looked at me, asking "ya mean winter?"
I would look back at you, just as puzzled & throw a snowball at the side of your head.

I think Christmas should have it's own official season. It's already shoved down our throat the day after Thanksgiving; in essence, it gets it's own month. *insert shrug, here*

As magical and wonderful as the season may be .. it's financially straining, stressful, chaotic, and the constant music makes my ears bleed on the inside. *insert disapproving headshake, here*

I only meant to whine about the money & chaos, but I went off on a little tangent. At my work, they've been blasting Christmas songs 24 hours a day for the last 8 days. I'm ready to jingle bell someone right across their one horse open sleigh. :)

I digress !! EEK !

Searching through pinterest and stalking friend's pictures of their own decorations on Facebook, I decided I needed to take a trip to the local thrift store. I spent $20 on a bunch of
  • lights
  • bulb ornaments
  • colored bells
  • big and small glass containers
  • strands of beads


Thursday, December 1, 2011

we'd like to buy a vowel ..

It's Thanksgiving and we're at Wal-mart ... the only place open in town. *insert terrified face, here.*

I'd already managed to elbow my way through tons of rowdy teens and pushy seniors. Ignored the yowling babies and acted like people weren't already lining up for midnight sales .. but they were.

Each person who disregarded my children, as they pushed rudely by them to save a few dollars; was met with a loud "EXCUUUUSE US!" and an appropriate crusty look.

My brain was already frazzled with the stress and all the other details that are involved with any trip to 'the city.' It's our 5th trip to the evil department store empire in 36 hours.

By the time we got to the crafty section; I'd have paid to be anywhere but under the blue-glow fluorescent lights of that God forsaken place.

In a split second decision, I grabbed our initials and got the Hell out of dodge.

we each designed and decorated our own letter, of course.


So .. even though this wasn't the initial idea I had (har har) ... I really like 'em. :))

Monday, November 28, 2011

a crafting area, all my own

As I write this post - my kitchen table, living room coffee table, and computer desk are all breathing a sigh of relief. Gone are the pains of random hot glue gun burns, spurts of paint and exacto blade slices into the veneer.

It didn't take a lot of time and/or effort to convince the hubby that I need a crafting 'hub.'

I merely gestured towards the 10+ years of boxes, scrapbooking folders, and endless crates of coloring/painting/art supplies that took our bedroom hostage, years ago.

Before I knew it, we were loaded into the Volvo and speeding off to our favorite thrift store. It took a total of 4 mili-seconds after I walked in the door, until I spotted an object of my desire. A crusty, old, beat-up, desk ... I loved it. This is the part where we fast forward 24 hours of anxious waiting for a friend to help move the desk.


after we sanded down the (many) rough spots that were on the surface, we covered it in 2 coats of a boring, flat brown/tan spray primer/paint.


This next step might seem a little ridiculous .. but we decided to 'faux' some darker wood onto the flat tan. I know ... "Why on Earth did you re-faux something that was already faux, to begin with?" ... simple answer : "Because we can!"


when it was all said and done, I really like how it looks :)


Looking back .. sanding and painting, priming, then re-fauxing this thing was the easy part. lol Once the paint dried, I realized I had to organize a decade worth of junk into my new, pretty space. There were containers on top of caddies, under folders, boxes and a bunch of mini-drawer systems ... *wipes sweat from brow*


half the 'wreckage' the new 'area' without the 'stuff'

I managed to sift through all the junk and re-organize the crafty bits into different categories. After that, I went and 'splurged' on some new containers.
($2/$4/$6 baskets on clearance from the Dollar Store-yay!)

I love my 'new' craft station! It even has a fishy friend to keep me company on my late crafting nights ... not that I ever have those. *wink wink*


Tuesday, November 22, 2011

our 'thankful wreath' craft

The first name I could think of for this craft was 'a wreath of that which we are thankful.' lol, even just typing that out, it's a LOT to say. So, I shortened it to 'the thankful wreath.'

I found this cute project a day after the death of my one and only crafty thanksgiving decor. It looked simple enough and like tons of fun .. it did NOT miss it's mark.

I saw a few different tips online for how to make the 'skeleton' to the wreath, if you will; from a wire hanger. While it didn't seem all too complicated .. I kinda cheated. I went to our favorite local thrift store and found a homemade wreath, there. I carefully removed the pieces of jolly decor and stashed them away in my 'use these crafty bits for later' box.

I tightly wrapped twine around the wire and hot glued it every so often .. very scientific. :)


I wrapped the twine for 2 reasons; I wanted it to cover the ugly hanger plus I liked the brown as part of the Autumnal theme. In the end, I discovered it was a crooked circle ... but I find it charmingly imperfect. :)


As I was wrapping the twine, the family mixed up a plethora of 'fall-ish' paint colors for the clothes pins.


Monday, November 21, 2011

a thankful door hanger .. that once was.

The 'pinspiration' for this idea was originally from Parents Magazine.

I decided to make one of these on my own, after the kids had gone to bed. It was relatively simple to make. Cardstock, a holepunch, glue sticks, post-it pad, a pencil and that wiry hay looking stuff. I have no idea what that stuff is called; but I found of it some in my 'save this stuff for later' craft box.

I cut out 2 large pieces of cardstock into the same rounded rectangle shape and taped them together. Then, I found a cup that fit generously over the door handle and traced the circle onto the cardstock hanger template. I cut out the circle and taped the edges of the paper on the inside of the circle back together.

I glue-sticked the container of holepunch bits onto the hanger. My husband pointed out that 'corn is more linear.' I made a mental note, for the next time I'm trying to emulate corn. :)

I attached the pencil with twine and hung it by the front door. Everyone got a chance to list out a few different things they were thankful for, before the inevitable happened.

Our very own adorable Nugget got ahold of it and taught it a lesson, while we were all at work & school, one day.

It was really cute to read the messages we all left, while it lasted.

I just took it as a sign that I shouldn't craft alone ;)


Sunday, November 20, 2011

Frosty the Fridge

There we were, discussing this year's festivities. When just thinking about putting up Christmas decorations made me sleepy. LoL - so, I decided to just go with this guy for tonight and then I'll think of the rest of Christmas, tomorrow .... maybe. ;)


It doesn't really need a whole lot of explanation ... does it ? :)
All the bits are made from card stock/construction paper .. easy peasy!

Saturday, November 19, 2011

crackling your marbles .. better than losing them.


we found a 'pinteresting' way to play with your marbles and we just had to try it. Our 8 year old collects marbles, so we didn't have to go far for this experiment.

On the website, it says to bake your marbles at 350 for 20 minutes, then immediately take them out and toss them into ice cold water. We did just that .. but ours didn't come out quite as we were expecting:


They kind of, sorta did what they were supposed to do, but not really. It seemed like they only barely 'cracked the surface' of their potential. (pun totally intended)

After some searching, we found one website that said to try baking them at 500 degrees, for 20 minutes.

We're going to have to try them like that, next time ... this was kind of anti-climactic.

Friday, November 18, 2011

Marbled Nails .. part deux

After trying this once .. I knew I would do it, again.

On the second go round, I realized I should spend a little more money on nail polish.
ok, let me clarify that statement.
clearly - I have lots of nail polish - I just need to get higher quality nail polish :)


I also figured out :
  • it's easier if you tape off all your nails to start with.
  • remove the scotch tape after the paint is completely dry
  • q-tips and toothpicks are necessities
  • it's CRUCIAL for the water to be room temperature
  • make sure to tape it up really good UNDER the nail, too. If you don't - it gets icky on the underside of your nails and they look dirty. ew !

Friday, November 11, 2011

Marbled Nails

On the surface, painting your nails a different color every other day and taking 45 minutes of your precious time, just to make sure they're pretty, might seem a little shallow.

Be that as it may ... I'm guilty of these crimes of superficiality.

In my defense, until the age of 32 I was a chronic chewer of my stubby, little fingers. In high school I had a lot of nerve issues and more than once had gnawed away until they were almost bloody ... ew. Sorry - I digress !

Around any holiday, I use it as an excuse to dress up my nails (and my puppy) festively ...


"Hi, Nugget!"
So, of course when I found this link - I had to figure out how to try it. Being the visual person I am, I searched on YouTube for an instructional video and got this really good one .. good once you get past the plinky plunky music. :)

Fast forward to my first try ..

I decided to put my shot glass collection to use, for once. I don't drink more than once every year or so, so it's nice to actually use them for something.


Wednesday, November 9, 2011

bring on the baby ...


Be it miracles or tragedies - life seems to hand these out in bunches. I consider myself very lucky to see more miracles than tragedies. Point in case : I have 5 girlfriends, all ready to pop & spew forth a human from their loins. awwww-babies!!!

One day at work, while jabbering away about the weekend - I mentioned the baby shower of a friend that had taken place. My good friend and co-worker, who I had watched grow from day 1 to month 8, mentioned that she was not having a baby shower for this little one. The first thought that went through my little head was that 'no baby should have to enter this cruel, cold world without first having a party all in their honor!

Before I knew what was coming outta my big mouth - I was throwing a baby shower. :)

As much as I love computers, graphics, and playing with paintshop - I'm not all that good at 'drawing' on a computer. I couldn't create the invites I really wanted in the time frame I had; so I found a really cute website. She picked one that she liked and I 'adapted*' it with her info and ultra sound pictures.

This is how it turned out ..

*by adapted, I mean I probably
broke some sort of rule by not actually buying them ...
so, I don't suggest anyone else do it*

The invites were the easy part ...

After finding games & activities that matched Katie's personality, it was time to figure out decor - that was the hard stuff !! *wipes sweat from brow*

I needed something that was a way of saying "thank you for coming and here's a cute thingamajiggy to take home."   Thank the Gods of the internet for Pinterest, where I found this adorable idea for baby booties ... I ran with it.

My make-shift craft area - (a.k.a. my dining table) which morphed into something beastly night after night ..


I used the lace, ribbons, and buttons I had in my scrapbooking supplies. After countless fingertip glue gun burns and unbelievable frustration at dollar store Styrofoam cups breaking - the booties were done.

I don't usually pat myself on the back .. but I totally did this time.
*insert beaming, proud face - here*


Now it was time for decorations to adorably 'take up space.'
I liked the idea of the clothesline. So, I headed to the local thrift store and found 3 girly pajama sets.
I also added newborn diapers with "baby girl" painted on them, to the mix.
I then hung it all onto some twine with old fashioned clothes pins.


I got really excited when I saw this idea for hanging balloons. I especially loved the idea, because it would save me money on helium for the mass amount of balloons I wanted. It was simple - we blew up and tied off the balloons with ribbon, curled it -then pinned them to the ceiling.


The website suggested placing a marble/penny in the balloon to 'hold 'em down' while they hang .. but I liked the way they would move with the air flow / movement of the room; so I left them empty.

Instead of expensive real flowers, we decided to make some of these super-cute tissue paper flowers. I was thankful because they didn't need to be perfect. Even if you cut or folded it funny, you could fluff and rearrange the petals into something that works; which was good for kids (and me).

Instead of using flower wire for the stems, like they did on the website, we attached the tissue paper to pipe cleaners. We then took diapers and rolled them around a pencil, wrapped a rubber band around the middle of the diaper & pulled the pencil out. We then took pre-cut strips of scrapbook paper with a dab of 2 way tape & secured the middle of the diaper. We stuffed the pipe cleaner stems down into the hole and voila -- tissue flower holders :)


I saw a bunch of ideas involving diapers - like diaper cakes and diaper castles, but I decided these flower stands were a way to incorporate the diapers in a unique as well as useful way.

On the subject of diaper cakes and castles -I 'merged' a few more crafty ideas, to fill the needs of the party. I grabbed 3 circular things laying around my house ...

(this is our giant serving tray, large tupperware lid, and a dollar store holiday tin)

I then wrapped the above items in aluminum foil, stacked them back up, and voila - our happy little cupcake castle.

I baked those bad-boys, but 100% of the credit for decorating goes to my super awesome, amazing husband, Gary. I showed him a couple different ideas of what I wanted and boy did he deliver, or what?!?!

I saved my favorite decoration for last - the blessing tree. I've seen these all over the internet and I just knew I had to make one. It's a tender way to get everyone in the party involved and send something home with mom, that they can cherish forever.

It's a very simple idea; you display branches in a vase. You then provide cards for guests to write and hang a message of love, hope, prayer, etc.

It ends up a very sweet thing for mom to read at home and a beautiful and interactive piece of the party.


We gathered branches from the neighborhood and put rocks in the bottom of the vase for weight. The cards were just folded up bits of scrap pretty card-stock attached to the party ribbon. I also printed one 8x10 of the invitation and placed it inside a frame, for mom to keep.


I found a bunch of fun games on this website and we had a blast. We played guess mommy's tummy size, list the baby items, memory with a twist, and pin the sperm on the ovary ... LoL.

It was a lot of fun involving the family and it went smoothly. The planning and preparation was relatively easy and so in-expensive to do .. I could almost say I would throw another baby shower. ... almost. lol