Showing posts with label gifts. Show all posts

Tuesday, May 21, 2013

what's for dinner ..

how did that get in there?
 
didn't we just buy toilet paper?

are we there yet?

how could you forget?

where the Hell did I put that?!

what's for dinner?

some questions are just so much easier to answer than others ... :)


I printed a simple menu template
put it into a $ 0.50 thrift store frame
covered the frame in washi tape
glued on bananagram letters
done - cute, simple dry erase menu :)
if only thinking up dinner was so easy ...


Monday, January 30, 2012

the necklaces were framed, framed I say!


I really don't think I could live without my weekly trip to the thrift stores.  It's retail therapy at it's cheapest and G. will sometimes takes the afternoon off work, to come thriftin' me.  

Other than spending quality time with my favorite man in the world - my 2nd favorite part is to raid  pillage browse their collection of previously loved picture frames.

While we were recently remodeling my crafting area, I had to relocate all the stuff in order to organize.  I stood back looking at the wood and glass cluttered walkway and even I found my frame stash to be ridiculous. 

So, while Pinteresting that night, I made the board dedicated to using up the hoarder's stash pile of frames and made a silent promise to myself to not purchase anymore until I cleared out at least 50% of the pile. 
A promise that I may or may not have broke 3 days later.

onto the craft ... 

I pulled out a ($1) frame for my star wars subway art.  I simply spray painted it with an 'aluminum' color, because I find it very galactic and futury.
1 frame down ...


Since that wasn't really anything complicated, I decided to take on a second frame.

I found this ($1) gold, glassless hexagon frame in the pile and immediately had a mental picture flash of the necklace holders I'd seen on Pinterest.


I am not a gold kind of girl.
I'm a silver and red and teal kinda girl.
So, of course this also got a healthy coat of spray paint.  
dark plum
G. screwed in some little hooks for me and I was done

I love it and can't wait to tackle the other frames.
I wonder what other ideas are out there, that I have yet to see for repurposing frames.

anyone .. anyone .. Beuller ? :)


Friday, January 27, 2012

our marbled Christmas ornaments


The nail polish marbling technique turned out amazing, I adore all that is Christmas (except the music), and I'm addicted to craftin'; this was a no-brainer.

During Christmas I can't find time to tie my shoes or paint my nails; let alone keep up with journaling every day.  In other words - we did these 6 weeks ago and I never got around to posting it. :)

Also, I didn't take pictures of the process .. so we'll be using our imaginations, today & this tutorial.


Instead of the shot glasses used to marble my finger nails; we used salad bowls to dip our ornaments into the room temperature water.

if I do say so myself .. they look marbleous. ;) hehe

she dipped the bottom, then the top - so the marble went all the way around.
we used red and white polish, to emulate a candy cane

Tuesday, January 10, 2012

the gift .. that almost wasn't

I won't even pretend that I don't use any 'gifting' situation as an excuse to craft.
new house ? crafty gift.
new baby ? crafty gift.
of course holidays, birthdays, etc .. crafty gifts.
I think you get it ...

A co-worker/friend was having the birthday party for her soon-to-be 3 year old. She invited my girls and I to come join in the fun.

Let me just say that this toddler is the cutest little girl with the roundest of cheeks and an absolutely intoxicating giggle. Who could say no to a party in honor of her special day?

I knew that I wanted to make 'word art' like this or this or this .. but with her name to personalize it. I decided I would use one of the canvases that I had leftover from shmelty crayola fun.

I'll try not to dwell on the first part of this project, too long -since obviously from the title; it was a complete fail.

I adhered some sticker vinyl letters onto the white canvas, spelling her daughter's name across it. Then, I taped off some clean lines with painters tape & painted with acrylic paint.


I couldn't paint the canvas all at once, due to tape covering parts of a few sections. So, I let the first few sections dry thoroughly - then peeled it off.

I'm glad I didn't get past the first part ... because if I invested a ton of time in completing the project; then it went bad .... I hate sure don't like that ! lol


I'm not sure if it was the texture of the canvas or the paint .. or what - but the lines that were revealed under the tape > were anything but the clean, defined lines I was looking for..
*frown face*


Then, as if the splotchy edges weren't enough; when I pulled the painters tape up off the silver section ... total disaster. I literally LoL'd .. like a crazy woman. lol

It was time to go to bed, only to return 'tomorrow' .. right back at the drawing board.

But, before I bent this canvas in half and started it on fire ... I decided to cover it with black paint - to reuse another day. *high fives self for not being destruct-o*

Sunday, January 8, 2012

letters of love .. and yarn

I won't lie - since the holidays are over I'm seriously craving projects. For the last 2 months, there's been an endless array of keepsakes, decorations, & baked deliciousness to occupy my stubby little hands.

Lately after work, I've found myself more than once searching through my pinboards for projects.

Let me just mention one of the few flaws of Pinterest .. addiction ! lol

You start to pin EvEryThinG you see & your 'I want to do this' list suddenly becomes massive. Before you know it you have 500 1000 2500 4025 pins .. :/

then ... all the crafty things start to look alike - aahhhhh !!

So with that in mind, I created my new 'bored' board for stuff I can ''''easily'''' create with stuff around the house and if I am lucky enough to have some free time.
the """"quotations"""" imply that I am using those annoying finger quotes - just fyi ;)

I looked through bunches tons waaayyy too many pins and found this. I figured it looked fun/simple/cheap, so I decided to give it a go.

I have tons of yarn and more cardboard from Christmas than I know what to do with - thanks to another 'flaw' of pinterest. Not wanting to throw AnYtHInG away .. just in case.

ok .. enough rantin' and ravin' - onto the craft !

I just know my husband has to be tired of hearing me say "... it looked so simple."

This particular craft wasn't hard - it was just a lot more time consuming than it appeared. I wish I could say this was the first time such a misconception was born ...

Not only am I an audacious 'I can get that done in no time' crafter .. I'm an 'I don't need instructions for that - let's just do it!' crafter ... >_<

I have a vast knowledge of the craft that I gathered from the 4 seconds of looking at the picture; I figured it was 5 pretty simple steps.
  • print out large letter
  • trace onto cardboard
  • cut out of cardboard
  • wrap in yarn
  • glue gun on the backside for stability
easy peasy ...

The girls had friends over for the night, so it was a perfect time for me to get to crafting. With my high tech accoutrement lined out before me - I was ready to go :)


I decided the easiest way to 'trace' the letter onto the cardboard, would be to create the polar opposite of a stencil.

I cut the letters out
applied 2way tape to the back
then, adhered the letter to the cardboard


This next step could have been done with pencils or crayons, just as easily .. but this seemed fast and more accurate. I also feared if I tried to 'color over' the letter cutout, I would bend and fold the paper - thus leading to a funky letter.

No.. my ocd won't let me do such things.

So .. I spray painted it I enlisted the help of my wonderful husband to paint them :)

It was a ridiculous 17 degrees outside .. he's such a gentleman!!

After he, so graciously, spray painted over the letters for me -I peeled the paper off the cardboard & revealed a perfect outline of the letters. *beaming proud face*


Thursday, January 5, 2012

personalized dry erase message boards

Our local thrift stores stock in lack of picture frames can 100% be blamed on Pinterest.

I had recently stock piled almost 2 dozen different size frames.
But, since creating the picture wall, making Christmas gifts and this latest project - I am down to one.
ONE
picture frame !!!
ahhhh !!
*breathes*

I'll get to the thrift store, tomorrow
... onto the craft !

I had seen 'i love you because' versions of this over & over & over ...

but this is what I did with mine ..
I found a scrapbook paper and a font that matched each girls style.
printed "_______ is awesome because ....."
cut & fit paper into frame
hung on wall with dry erase marker & wait for shenanigans ! :)


Saturday, December 17, 2011

love for teacher


Third grade has, so far, been a year of change. Since kindergarten our daughter has consistently shared a classroom with her 'very besties.' Much to her disappointment, she was not placed with her close inner circle when it came time to assign classrooms this year. In fact - she got placed with a, shall I say, less-than-compassionate teacher.

Long story short - an anonymous donor afforded our small school enough money for 1 extra 3rd grade teacher. When it came time to reassign 5 kids from each class .. we made it clear we would love (with a capital L) for her to be able to change. we did a happy dance when she did :)

She's had nothing but straight A's and nice things to say about her teacher .. I'm so glad. I remember third grade being such a 'transition' for our oldest. Cursive and multiplication and all that .. *phew*

Anyway .. /end rambling :)) She was very excited to make her teacher a gift for the upcoming holiday.

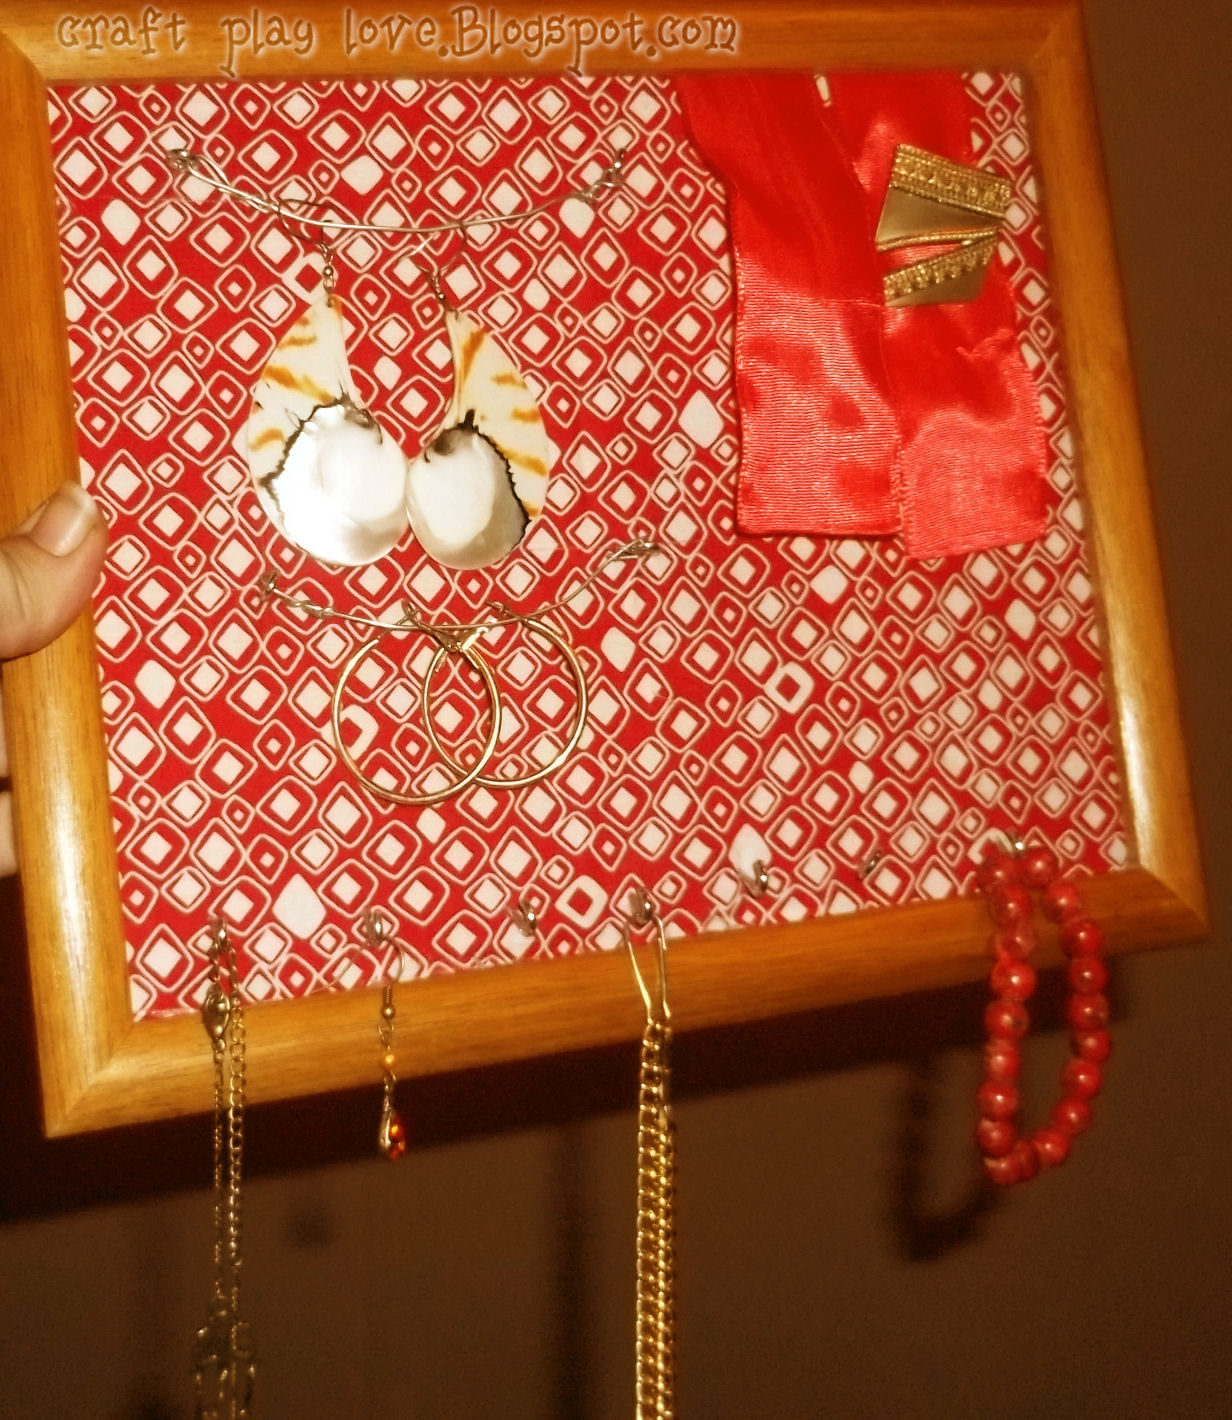
of course .. finding myself pinspired - "we" chose to make her our own style of one of these types of 'picture frame jewelry displays.'

I thought it would be as simple as discard the glass - cut & glue together a piece of cardboard - glue on a layer of cork board - cover with fabric - then attach screws in hooks, ribbons, embellishments.. etc. done. hehehe .. no.

First .. it didn't really need the cork. It needs wood in order to really secure the hooks for necklaces.

Second .. it didn't fit the 'hanging back' after I glued all the pieces in. (it worked this time, though - because she got to sign a little Merry Christmas on the back, with her name/school year, etc. ... the teach can figure out how to hang it :P )

Third .. there was going to be NO hand-screwing of hooks into the frame. There was just too much pressed wood .. :/ ouch.

Fourth .. trying to eyeball a straight line, while screwing into cork .. isn't a good idea.

Despite the hurdles .. we managed to get 'er done.

When/if I do this again, I'll be going with separate frames for each type of jewelry. It would be a cool feature on a wall to line up three 5x7 matching background frames - one for long stem earrings, one for backed earrings, and one with nothing but big hooks for necklaces. :) I smell another prrrooojeecctt ! :P But for now .. here's the one I've been rambling about.


  • we removed/ discarded the glass
  • cut out an identical piece of cardboard as well as cork to fit the frame
  • hot glued fabric to cover the front
  • hot glued the hanging ribbon, to the back
  • hot glued the entire piece into the frame
  • screwed a (not so straight) line of hooks along bottom
  • screwed in hooks with wire attached between, up top
  • high five the kid .... then mentally scrutinize all the things I'd do better, next time
  • done ! :P