Showing posts with label pinterest. Show all posts

Wednesday, February 27, 2013

Lego Box of Awesome


I honestly think I could hear my mom's heart breaking, despite the two time zones and 2,500 miles that separate us.

She was on the phone discussing upcoming Christmas gifts with our 9 year old and I only had to hear her answer, to know the question ..

"No, Gramma. I don't even like princesses OR Disney Princesses.  I like cars and guns and legos and robots and helicopters ...."

That answer, in and of itself, pretty much sums up our girls and our lives.
They're as happy as can be - living life as little, redneck tomboys.
It's nice, because I actually prefer them to be rough n' tumble versus frilly n' froofy.

Fast forward to Valentine's day .. 

our fourth grader had a fabulous idea for this year's Valentine's box.
She wanted to connect a few boxes to create a huge, three-part Tyrannosaurus Rex; complete with giant head, tiny arms and a tail.. :)
Cute.
ambitious and elaborate, but still cute.
I really did love her idea, but I knew it wouldn't be within the classroom guidelines.  So, I decided to innocently peruse pinterest for another idea that maybe, just by chance she'd like.

Within a minute or four, I'd stumbled upon the original lego box of awesome (ok, that might not be the actual title of the original post that inspired us.  sue me.)

I showed her the idea and she got so excited about making this, instead - that I actually thought maybe she had forgotten about the T-rex. 

until ..

"One day, mom, when I'm a grown-up and don't have a teacher to tell me how big my Valentine's box is; I'm going to build a HUGE T-Rex and you'll have to stick your hand in his mouth to give me my Valentine's card."

she smiled and laughed as she walked away to gather materials.

I didn't have a chance or the heart to tell her we don't build Valentine's boxes, as adults.
Then, I figured she already has to grow up too fast in this world.
So,  I'll save that, for another time. ;)

I also found it ironic she should mention robots in her answer to my mom;
considering her last years' Valentine's box .. lol - my kids RULE! <3 :)

supplies for our Valentine's Lego box of Awesome
a box, box-cutter, spray paint and six 'dixie cups'


I commissioned the local, hot handy man to cut holes into the box - about the same width as the middle of the cup. 

we also placed some tape onto the box, holding the cup up from underneath .. just in case.

we taped the top of the box shut, sprayed on a couple coats of paint
voila !


Wednesday, February 20, 2013

chicken pot pie biscuits of ridiculousness


Different meat, soup & prep methods; inevitably ending up with the same thing.  
A biscuit with cheese, soup, meat and veggies baked into it.

No matter the different spices, measurements or personal twists people lend to the recipe; in just about every one I saw online, people were calling them CUPCAKES. 

@#($&*@#*&%$*(%&$(*%&

At BEST I would think they'd be considered muffins.
They're missing the ever-important qualifier to receive cupcake status. 
Icing.                   *homer simpson drool*
If not having icing isn't enough to disqualify them as cupcakes
- consider this mind blowing fact -
THEY DON'T EVEN HAVE CAKE !! 

LOL .. I'll give you a minute to mull that one over.

Anyway .. I think I had a point.
Oh yea - we'll always call these 'chicken pot pie biscuits' in our house.
Enjoy!!
They're ridiculous easy & ridiculous delicious.
I'm such a girl that I ate them with a fork.
judge me all you want .. I've got cupcakes. biscuits.


Chicken Pot Pie Biscuits

2 cups cooked chicken, diced.
1 can cream of chicken soup
1 cup veggies
1 cup cheddar cheese
salt & pepper
2 cans biscuits

Preheat oven to 400 degrees
In bowl, combine the diced chicken, soup, veggies, cheese and spices.
Separate your biscuits, spreading each one slightly so they are like a tiny crust.
Oil your muffin pan and spread the dough, pressing down the sides and into the center.
place your meat mixture into the center of the 'crust'
Bake for approximately 15 minutes, checking at about 10 (just to be sure they aren't overflowing, exploding, spilling over, bursting into flames or any of the other things that float through my mind as I bake something for the first time. :) 

Tuesday, January 15, 2013

don't eat the multi-colored snow ...

Actually, you could totally eat the colored snow in our yard; but I wouldn't suggest it. 

I know the last post I made about the snow was kinda sorta whining about it; but we did have some fun with the white stuff.

There's always the obvious snow play : sledding, snowball fights and snow angels.

Today, we added snow paintin' to the mix .. water bottles with water + food coloring.

 You just know there's hours and hours of fun and/or mischief to be had. ;)


I even got to write my name in the snow ...
why should the boys get to have all the fun ?!?! LOL


I don't know what compelled me - but I made this printable.
the picture is from one of our camping trips this year

we all need to remember there IS good as well as BE the good


a frozen desert ...

If the title of this post had ONE MORE S, we'd be discussing malt chocolate milkshakes and the magical power they hold inside their delicious frozen walls of cocoa.

Unfortunately my spelling is fine and I did, in fact, mean to put desert.

I'm not a stranger to the freezing cold but I could never be mistaken for a fan of the winter, either.

Our town hadn't even seen any snow since 2010, so most of us were pretty enamored with the winter wonderland bestowed upon us right before Christmas.

In the beginning, I didn't find it completely annoying.
It was even kinda charming on Christmas day.
Now it's 2 weeks into 2013 and I'm ready for the white stuff to be gone.

I much prefer sunrays and leaves over icicles and shivers.

our driveway ... what a difference 2 months can make.
I know the 'before/after' photographs of our seasonal driveway appear backwards; but I did it on purpose.  I am looking forward ... 

In 2013 I'm trying to focus more on the positive ... so I'm at least grateful for the fun we had and the beautiful pictures I got to take; even if my fingers almost fell off in the process.

Nugget got to play in his first snow fall and the girls bought their first sled.  They stayed out until their noses were cherry-red and Nugget was shivering through his fur.

Of course we still had to force them to come in ..


After playing in the snow with new sleds and taking pictures of the kids in a sea of the dreadful pretty powder; we also wanted to get crafty.  We decided to make birdfeeders since our winters in Moab aren't usually so cold that your face feels like it's gonna freeze off.

The girls didn't want anything to do with the project, leaving G. man and I to save the world one cold bird at a time. 


We found some stuff lying around the house  and crafted together a plan for feeding our feathered friends. Creating all three 'hangers' only took an hour and cost nothing, since we had everything 'laying around.'

bird feed hanger # 1 .. milk jug
G. man cut out the side panels of a milk jug. 
Poked a hole on each side of the jug, underneath the cut outs
placing the twigs through for a perch. Then, poked 
2 holes through the top and laced the twine to hang the feeder.

bird feed hanger #2 .. spaghetti holder + a plate
We glued an old saucer to the bottom of the spaghetti holder
then, we drilled two holes through the top (for twine, to hang) 
as well as two holes through the bottom. (for seed dispensing)


The milk jug and noodle holder were the 'original' bird feeder projects.

After hanging the 'originals' outside; G. man ran into the mud room, grabbed some firewood and threw together the third bird feeder in less time than it would have taken me to get my camera back out of it's bag.    

ssooo .. needless to say - I didn't get any pictures of the 'process' for this one.

bird feed hanger # 3 .. got wood?
G. man drilled 4 holes in the corners of the firewood,
looped some twine through the holes ..  done.
 He's so cool.

The birds love the feeders and we love the birds - so it's a win-win situation!
Now, to work on gettin' rid of the damn snow ...


Friday, July 13, 2012

home faked deliciousness ..


Even though in my teenage years I worked at a Red Lobster & made hundreds of dozens of the actual 'cheddar bay biscuits' ... I had never attempted to make 'em at home.

until now ...

I made 'em ... everyone loved 'em.

what else matters ?

haha oh right .. a recipe might help, eh ?
I used the recipe below @ the girl who ate everything.com.

I hope your family enjoys them as much as ours did :)


Ingredients:

B
iscuits:
2 1/2 cups Bisquick
4 Tbsp cold butter
1 cup cheddar cheese, shredded
3/4 cup milk
1/4 tsp garlic powder

Butter Glaze:
3 Tbsp butter
1/2 tsp garlic powder
3/4 tsp dried parsley flakes

Instructions:
Preheat your oven to 400 degrees. Lightly grease or line one cookie sheet with parchment; set aside.

Combine Bisquick with cold butter in a medium bowl using a pastry cutter (I just used 2 forks). Don't worry about mixing too thoroughly; there will be small chunks of butter in the mix about the size of peas. Add cheddar cheese, milk, and garlic powder. Mix by hand until combined, but don't over mix.

Drop 1/4 cup portions of the dough onto the lightly greased or parchment lined cookie sheet. Bake for 11-13 minutes in preheated oven or until the tops of the biscuits begin to turn light brown.

While the biscuits are baking, melt butter is a small bowl in the microwave. Stir in garlic powder and dried parsley flakes. Use a brush to spread the garlic butter over the tops of all the biscuits. Sprinkle a little kosher salt on the freshly coated biscuits. Makes one dozen.


Friday, February 24, 2012

the wipey board of awesome ..


In our town, when the world is a frozen Hell winter comes - it gets super quiet.
so, this time of year, the stuff is pretty 'hit or miss' at the thrift stores.
luckily, this winter I've found lots of 'treasures.'
(that very word conjures a mental image of Hoarders *shudders* I promise to try not to use it again)
... moving on ...


when I picked up this serving tray, to look at it 
our 8 year old giggled as she said to us
"ooooohh he can bring you breakfast in bed, Mom!"
then ran off laughing at her announcement
LoL .. she's awesome.


I wanted to turn it into a 'dry erase drawing tray' for the aforementioned goofy girl.

But at $4 .. this is a spendy thrift for me.

I actually had to rethink it .. twice
lol  *shrug*

I got home and  it sat for a week got started
I removed the wood sides of the tray, then spray painted them


Monday, January 30, 2012

the necklaces were framed, framed I say!


I really don't think I could live without my weekly trip to the thrift stores.  It's retail therapy at it's cheapest and G. will sometimes takes the afternoon off work, to come thriftin' me.  

Other than spending quality time with my favorite man in the world - my 2nd favorite part is to raid  pillage browse their collection of previously loved picture frames.

While we were recently remodeling my crafting area, I had to relocate all the stuff in order to organize.  I stood back looking at the wood and glass cluttered walkway and even I found my frame stash to be ridiculous. 

So, while Pinteresting that night, I made the board dedicated to using up the hoarder's stash pile of frames and made a silent promise to myself to not purchase anymore until I cleared out at least 50% of the pile. 
A promise that I may or may not have broke 3 days later.

onto the craft ... 

I pulled out a ($1) frame for my star wars subway art.  I simply spray painted it with an 'aluminum' color, because I find it very galactic and futury.
1 frame down ...


Since that wasn't really anything complicated, I decided to take on a second frame.

I found this ($1) gold, glassless hexagon frame in the pile and immediately had a mental picture flash of the necklace holders I'd seen on Pinterest.


I am not a gold kind of girl.
I'm a silver and red and teal kinda girl.
So, of course this also got a healthy coat of spray paint.  
dark plum
G. screwed in some little hooks for me and I was done

I love it and can't wait to tackle the other frames.
I wonder what other ideas are out there, that I have yet to see for repurposing frames.

anyone .. anyone .. Beuller ? :)


Friday, January 27, 2012

our marbled Christmas ornaments


The nail polish marbling technique turned out amazing, I adore all that is Christmas (except the music), and I'm addicted to craftin'; this was a no-brainer.

During Christmas I can't find time to tie my shoes or paint my nails; let alone keep up with journaling every day.  In other words - we did these 6 weeks ago and I never got around to posting it. :)

Also, I didn't take pictures of the process .. so we'll be using our imaginations, today & this tutorial.


Instead of the shot glasses used to marble my finger nails; we used salad bowls to dip our ornaments into the room temperature water.

if I do say so myself .. they look marbleous. ;) hehe

she dipped the bottom, then the top - so the marble went all the way around.
we used red and white polish, to emulate a candy cane

Monday, January 23, 2012

words that stick out .. 2 ways


For the third time that week I found myself in the Volvo, rumbling aimlessly down the highway. Of course, by aimlessly - I mean I was headed towards my thrift store.

Friends of mine ''work" at my 2 favoritestest stores, so I can always stroll in dawning slippers and pajama pants; no fear of judgment for my thrifting addiction & fashion backward looks. :)
I may or may not be jealous of their jobs and make a little bratty face when I say ''work'' ..

Today, though .. this thrift store visit; it was going to be different.
Not different as in 'actual shoes instead of my fuzzy slippers different'...nuhuh.

I was hellbent on locating those damn scrabble pieces for some fun craftsies ...

Clearly, the powers that be are aware of my 'not messing around' face ..


The thrift Gods were smiling down on me & I found a "3D rsvp edition" instead of flat scrabble ..

I cringed a little bit later, after finding out it was the 1966 version. But forgave myself by reminding myself that the craft Gods approve of merging vintage with modern.

ok .. onto the craft


supplies

1. frame
2. fabric
3. scrabble word jumble
4. glue gun
5. mod podge


Sunday, January 15, 2012

cowboy casserole


a buncha years ago - way back in the time before I had a clue, a car or even a hint of normalcy; this was known on many late nights to my friends and I as 'tatertot casserole.'

however - when I found the long lost potatoe goodness a couple months ago on Pinterest ... it's been known as that blog says ever since - Cowboy Casserole.

I ran to the grocery store and retrieved all the ingredients needed to make the cheesy treat that very night; just as I do with far too many things I find 'pinning.'

Friday, January 13, 2012

high heel necktie ring display + holder


when I stumbled upon the pinspiration for this craft - it appealed to me for a couple reasons. It looked simple'ish, it was cute, clever and I could have sworn I had everything I needed in a closet, somewhere ... ( famous last words ... )

Despite being five foot nothin' - I am not a high heel girl; I'd die without my flip flops & sandals. So, when I said they were 'in a closet' .. I meant I hadn't worn them for over 2 years. *shrugs* I do barbecues and bowling .. not formals and fancies.

I also knew I had ties from when I waited tables at a fancy-shmancy restaurant, years ago.

Long story short .. we ( mostly hubby) tore our closet apart and I had neither ties nor heels!!

For the life of me, I just could NOT recall throwing away all those old shoes.
I mean really .. what women throw away shoes ?!?
Apparently five foot nothin' women with 1,100 square feet, 2 kids, a puppy and no crafting room/garage/storage shed.

No biggie; I now had a legitimate reason to head down to the thrift stores :) *yay*
LoL
I don't really need an excuse - he loves thriftin' as much as I do. double *yay*

we piled into the car, down to the store, and bought the things we needed for this one craft.
and ONLY the things we needed for this one craft ....


ok .. I lied .. LoL
onto the craft ..


Supplies are regular stuff that everyone probably has lying around .. except me :)

neckties / glue guns / scissors / high heeled shoe

Friday, December 23, 2011

multiple rudolphs spotted!!

OOOoohhhhh !! It's the 'day before the day before Christmas!'

I just can't WAAAAAIIIIIT !!
..... but they say I have to (frowny face).

So, today to pass some time - mission : Christmas treats for friends & neighbors.

the star was definitely the 'pinspired' Rudolphs

They're simply sugar cookies in a gingerbread man shape, turned upside down and painted awesomely .. by my super-amazing, excellent icing piper husband ;)

By the time these were ready to be beautified, I was so baked out, carded out and shopped out; I couldn't see straight. I merely showed him the picture and he happily went to town ... one more reason I love him so.

The final product was a dozen or so friends and family trays ... yum-o.

Just a few of our family's traditional Christmas treats, ever since I can remember.

Happy Holidays and try to do something nice for someone who has less than you .. pay it forward.


(left to right, clockwise) chocolate cherry cheese squares, walnut walkaways, peanut butter cookies, Gramma Kitty's sugar cookies, and brownies.

Saturday, December 17, 2011

love for teacher


Third grade has, so far, been a year of change. Since kindergarten our daughter has consistently shared a classroom with her 'very besties.' Much to her disappointment, she was not placed with her close inner circle when it came time to assign classrooms this year. In fact - she got placed with a, shall I say, less-than-compassionate teacher.

Long story short - an anonymous donor afforded our small school enough money for 1 extra 3rd grade teacher. When it came time to reassign 5 kids from each class .. we made it clear we would love (with a capital L) for her to be able to change. we did a happy dance when she did :)

She's had nothing but straight A's and nice things to say about her teacher .. I'm so glad. I remember third grade being such a 'transition' for our oldest. Cursive and multiplication and all that .. *phew*

Anyway .. /end rambling :)) She was very excited to make her teacher a gift for the upcoming holiday.

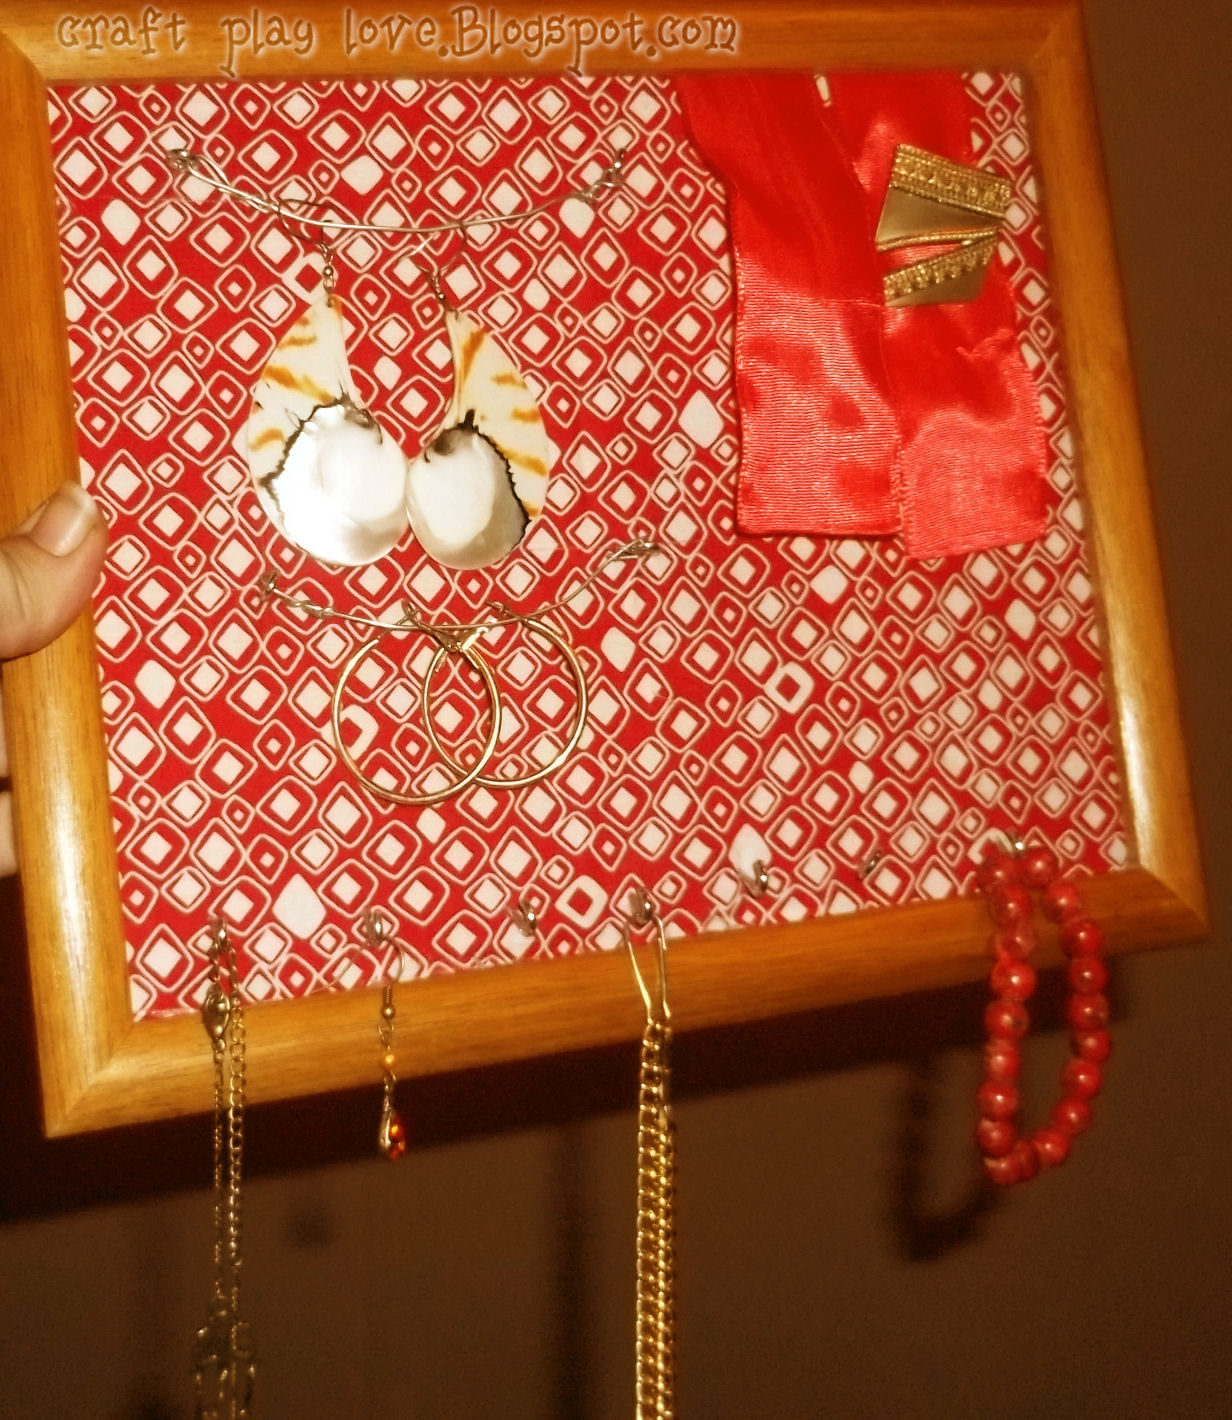
of course .. finding myself pinspired - "we" chose to make her our own style of one of these types of 'picture frame jewelry displays.'

I thought it would be as simple as discard the glass - cut & glue together a piece of cardboard - glue on a layer of cork board - cover with fabric - then attach screws in hooks, ribbons, embellishments.. etc. done. hehehe .. no.

First .. it didn't really need the cork. It needs wood in order to really secure the hooks for necklaces.

Second .. it didn't fit the 'hanging back' after I glued all the pieces in. (it worked this time, though - because she got to sign a little Merry Christmas on the back, with her name/school year, etc. ... the teach can figure out how to hang it :P )

Third .. there was going to be NO hand-screwing of hooks into the frame. There was just too much pressed wood .. :/ ouch.

Fourth .. trying to eyeball a straight line, while screwing into cork .. isn't a good idea.

Despite the hurdles .. we managed to get 'er done.

When/if I do this again, I'll be going with separate frames for each type of jewelry. It would be a cool feature on a wall to line up three 5x7 matching background frames - one for long stem earrings, one for backed earrings, and one with nothing but big hooks for necklaces. :) I smell another prrrooojeecctt ! :P But for now .. here's the one I've been rambling about.


  • we removed/ discarded the glass
  • cut out an identical piece of cardboard as well as cork to fit the frame
  • hot glued fabric to cover the front
  • hot glued the hanging ribbon, to the back
  • hot glued the entire piece into the frame
  • screwed a (not so straight) line of hooks along bottom
  • screwed in hooks with wire attached between, up top
  • high five the kid .... then mentally scrutinize all the things I'd do better, next time
  • done ! :P